Friday, 12 October 2012

LDN : SKINS self tan mousse


LDN : SKINS mousse tan
IMG_1775

LDN : SKINS Tone 3 Self Tan Mousse* - £28
available online

If you've see me looking vaguely tanned in any of my most recent outfit photos, best illustrated here and here, it is most likely all thanks to this wonderful self tan from LDN : SKINS. I go through stages of loving and loathing fake tan. I love the bronzed limbs and sunkissed glow you get from this beauty shelf staple yet loathe the preparation and the frantic flapping that follows. Not to mention that smell! This product however is an absolute delight to use and gives me such a natural, yet deep golden glow with a rather delightful scent to match.

The consistency is light, foamy and finely whipped so glides onto your skin effortlessly. It dries relatively quickly (which I like) and has a good guide colour so it is easy to see where you have applied the product, ensuring no white patches are missed! I tend to apply my fake tan in the evening and let the colour develop overnight, before washing it off in the morning. Even after one application you are left with a glow to rival any Amazonian goddess and because it is infused with English lavender, it actually smells quite nice! This is the darkest shade from the LDN : SKINS self tan repertoire but if you are after something a little subtler, then tone 1 or tone 2 will give you a more understated colour. It has an impressive lasting time too, staying strong for almost a week before slowly fading. As always, the tail end of your fake tan is always the most frustrating part of the whole process. This tan, like many others I've tried, did go a little patchy after day five or six but this was nothing a good scrub and a dousing of baby oil couldn't sort out! For someone who always thought lotions triumphed over mousses when it came to the self tan stakes, I may have been converted by this little beauty.

What fake tan are you currently loving? Have you tried anything from the LDN : SKINS range?

View Post

new baby cupcakes

new baby cupcakes
new baby cupcakes
new baby cupcakes

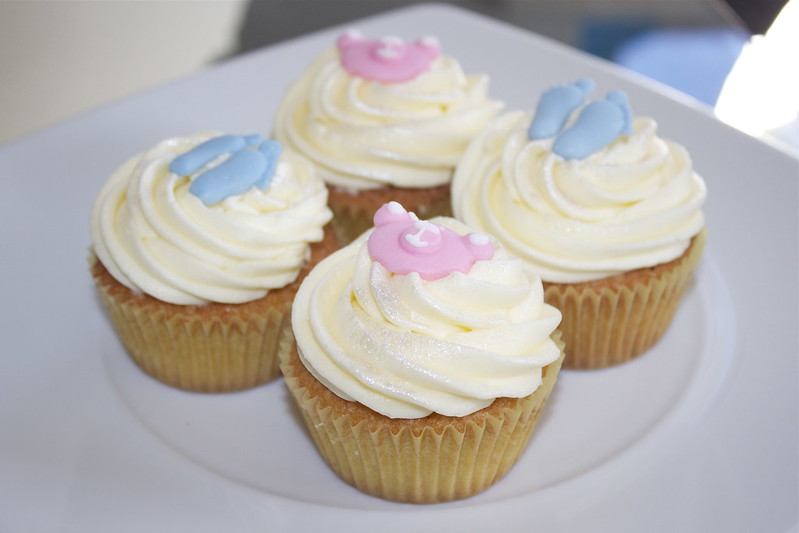
My little sideline cake making enterprise has been neglected somewhat recently, mainly because I have been so busy with many other creative outlets in my life. But when someone at work asked if I could bake some new baby cupcakes for a heavily-pregnant colleague of theirs - I jumped at the chance. (Any excuse to use my new kitchen aid!) With the sex of the baby unknown, I opted for an assortment of girl and boy themed cakes, swirled with vanilla buttercream, delicately sprinkled with edible glitter and crowned with some adorable blue and pink toppers. Now I wish I could take the credit for these sweet feet and teddy bear toppers but with time pressing, I had to call upon my local market who had an abundance of different cake toppers to choose from.

To make the cakes I used the following simple recipe which will give you about 12 individual cupcakes with just enough left to lick the bowl with!
6oz caster sugar, 6oz butter (whizz) 3 eggs, 8oz self-raising flour, capful of vanilla extract (whizz). Divide equally into your cupcake cases and place in a pre-heated over at 180 degrees C for 15-20 minutes.

Making the buttercream couldn't be easier. Simply whisk together 8oz softened butter with 16oz icing sugar, adding a splash of milk if necessary to loosen the mixture. At this stage you could also add a dribble of food colouring to your buttercream if you wanted to make your creations beautifully colourful. Piping the perfect swirl is a fine art that requires practice, patience and a steady hand but once you've got the knack, there will be no stopping you! If you refer to my post here, I talk in details about all the apparatus and techniques I use to make my simple cupcakes which will hopefully help you if you are getting your bake on this weekend!

Happy (food) Friday - I hope you all have super weekends.

View Post

Thursday, 11 October 2012

Bourjois 1 seconde rouge obscur

bourjois 1 seconde rouge obscur

Bourjois 1 seconde gel texture nail polish* in no.12 Rouge Obscur - £5.99
available from Boots and Superdrug

As Autumn creeps upon us, so does the nagging desire to revert everything bright and colourful into something dark and vampy, and this begins with the nails. It is time to bid farewell to my pastel love affair and embrace the moody and the dramatic with sinister berry hues and opulent inky shades. And this nail polish from Bourjois fits the bill perfectly. With its rich, gel-like texture you get a professional-looking finish with an on-trend colour to match, yet it is one of those colours that is irritatingly tricky to describe. In some lights it is a rich burgundy, in others it hints at a reddy-brown. Either way however it is a gorgeous shade with an irresistibly silky application and finish, and is the perfect polish for the current season.

Have your nails gone over to the dark side?

View Post

Wednesday, 10 October 2012

Perricone MD No Concealer Concealer

Perricone MD No concealer concealer
Perricone MD No concealer concealerperricone md concealer
IMG_1151

Perricone MD No Concealer Concealer* - £37
available online and in John Lewis

"a multi-tasking concealer that delivers flawless coverage with one universal shade"

Without wanting to appear smug or tempt fate, concealer isn’t one of those products that I have to use on a day to day basis. Following my primer and foundation base, I often find my skin is even and perfected enough to continue onto my next step, sidestepping concealer all together. However, sometimes I am cursed with the dark circles or rogue blemishes that pop up from time to time, and it is moments like these that I am thankful for a good concealer. Recently I have been using Origins Plantscription concealer which is great for quick touch ups but when I want a more industrial blend, I have been reaching for Perricone MD’s No Concealer Concealer. Stemming from the unprecedented success of their foundation called (you’ve guessed it) No Foundation Foundation, Perricone MD created and released a multitasking treatment and concealer product that is specifically formulated for the eye area.

This concealer is brilliant at camouflaging imperfections instantly and giving the under-eye area a subtle radiance and flawless finish. The consistency is rich and creamy, but not at all tacky or drying, and won’t end up creasing in the fine lines around your eyes. The best way to apply this product is to warm a small blob between your fingers and gently press it into the skin. The smooth, blendable texture seems to just melt into the skin like a dream for a more awakened eye and doesn’t require any further rubbing or buffing in. The product comes with a self-assembly pump which makes it so easy to regulate how much product you want to dispense so you won’t end up wasting a single drop of this product. Despite being designed to brighten the dark contours around the eyes with its salmony-pink tones, the no concealer concealer also works wonders at minimising redness on other areas of your face, making it a wonderfully versatile product. It can also be used as an eye primer too! The formulation is packed full of anti-ageing agents and SPF protection so will deliver results instantly and over time, which is always a good thing!


The only bad things I can say about this product is firstly, the scent and secondly, the ‘universal’ shade. Sadly the scent of this product is not good and the stale pungency may lead to the holding of breath during application! And the one universal shade that this concealer comes in will probably not suit everyone. For me it was perfect, but it may be far too light or dark for others. But if you get can get past the scent and find this concealer is a good colour match for you, then you are in for a real treat.


Which concealer are you currently loving? Have you tried anything from the Perricone MD range?


View Post

Tuesday, 9 October 2012

Bioderma Créaline h2o

IMG_0505
IMG_0504

Bioderma - makeup remover and cleansing solution
available online (£11) and at the much anticipated BeautyMART in Harvey Nichols (£16.50)

Biodema. Once a far off wonder exclusively stocked in French pharmacies and a highly-coveted product amongst beauty experts and skincare junkies alike, it has now landed on English soil and I am well and truly sold on this little french fancy. My lovely friend Fei actually picked me up a bottle of this much acclaimed cleanser a couple of months ago, whilst its presence here in England was still rather elusive, and it has become the creme de la creme of my makeup removal regime ever since. Bioderma is part of the micellar water family, of which there are many options on the market, and have quickly become a staple product of makeup artists and lovers alike due to its effective ability to absorb dirt and makeup. A micelle is a tiny oil molecule suspended in soft water which means these cleansers absorb makeup rather than smear it all over the skin. They are also extremely kind and gentle to the skin.

I was maybe a little sceptical at first at how this cleanser, so seemingly inoffensive, could be so thorough when it comes to removing makeup. The water-like solution is ridiculously gentle yet so effective and pretty much soaks up your makeup without leaving film or a greasy feel to your skin. This cleanser is fragrance-free and hypoallergenic so won't aggravate the skin or leave you red-faced or puffy-eyed. It is easy to dispense straight onto cotton wool pads and isn't even fazed by the toughest of waterproof mascaras or the blackest of liners. Inspired by Lisa Eldridge's makeup removal video, I like to soak two pads in the cleanser and then leave them resting on my eyes for a minute or so before wiping my eye makeup away. I then take one more pad to remove the rest of my face makeup, et voila - the time and effort of makeup removal is dramatically minimised in an instant! Bioderma literally melts your makeup away without needing to scrub and leaves your face feeling so fresh, you don't even need to rinse your skin afterwards. I am officially in awe of this product and will definitely be stocking up next time I visit Harvey Nicks!

Are you convinced by this cleanser? Will you be giving it a go?


View Post

Sunday, 7 October 2012

crayola crayon art

crayola art
crayola art
crayola art
crayola art
crayola art
crayola art

Simple modern art with crayola crayons!

So I am going a little off piste with this blog post, but considering I always get a positive reaction to my baking posts, I thought I would share with you some of my other homemade creations, starting with this simple crayola art that Rob and I just finished today. In between baking, blogging and working, we are always on the hunt for home improvements and when we saw a picture of this art a few weeks ago, we knew we wanted to give it a go ourselves. Our flat lends itself perfectly to this type of decor with our multi-coloured smeg fridge, Andy Warhol canvases and modern touches, so we knew it would make a great feature for our hallway and couldn't wait to get creative!

To create this crayola art, you will need:
1. a canvas
2. crayola crayons (don't be thrifty and buy pound shop crayons. These won't be wax-based and will not melt. Ever. Trust me..we learnt the hard way!)
3. superglue
4. a hairdyer

The canvas we used was 30" wide by 24" tall and we needed a good four boxes of crayons to fill the width of it. You can arrange your crayons in any which way you like but we opted for a rainbow-like arrangements so we laid them all out first in our colour preference before we started glueing them. This also meant that several of the colours were redundant from the pack which now means we have an abundance of black and brown crayola crayons in our flat! Once you have all your crayons laid out, take your glue and cover one side of the crayons before positioning and sticking it onto the canvas. Continue until you have stuck all your crayons down and then leave for at least 24 hours so the glue can properly set.

24 hours later and you are ready to make some art! The next stage can be quite messy so ensure you cover the floor/nearby walls with newspaper to avoid any wax splashes. We decided to do it on our lino kitchen floor which was the perfect surface as any rogue wax splatters were easily scraped up and disposed off. Switch your hairdryer on to the highest heat setting but the lowest power level and concentrate on a small section at a time. You will notice that some of the colours melt quicker than the others. The dark purples and blues loved the heat, but the pinks and the oranges took a little bit more persuasion. I went through once, melting the crayons to about halfway down the canvas and then went back over them until they began to reach the bottom. It took about 50 minutes of arm ache and devotion to complete the whole canvas.

crayola art
crayola art
crayola art
crayola art

And there we have it, simple, quick and easy modern art! There are so many variations you could do with this type of art, the possibilities are endless. I would quite like to take smaller canvases and create a colour gradient across the wall with different shades of crayons. You could also position them at an angle or even hang the art upside down to give a really modern twist to this colourful creation.

What do you think of my crayola art?

View Post

Saturday, 6 October 2012

wish want wear


sass & bide dress outfit wish want wear  
sass & bide dress outfit wish want wear
IMG_1775
sass & bide dress outfit wish want wear

Dress* - Wish Want Wear 
Earrings - H&M
Shoes - New Look
Bag* - Romwe
Lipstick - LOOK double hit lip in Pink Punch

So Thursday night was the big night, the date that was circled in many bloggers' diaries and has been highly anticipated for some time now - it was the Cosmopolitan Blog Awards. For the second year running I was shortlisted in the Established Beauty Blog category so it was a great honour to attend the event, get all dressed up for the occasion and celebrate the achievements of some very brilliant bloggers. The lovely people from Wish Want Wear, your designer dress hire destination, contacted me and asked whether I would like to wear one of their incredible designer dresses for the night. And of course I jumped at the chance! I love that there is literally a dress for every occasion on their site, from fancy cocktail dresses to a full on ball gowns, and after agonising over several options I opted for this gorgeous tribal peplum dress by Sass & Bide. The hire price includes a back up size for free (just incase you are deliberating over which size to pick) and free returns as well, so it is a great option if you want the chance to dazzle in designer for the night.

The whole evening was great fun, although I don't know which I enjoyed more, the actual awards or the wagamama afterwards with the girls. Sadly I didn't win but just wanted to say thank you to anyone who did nominate/vote for me in the run up to the awards and maybe it might be third time lucky for me next year!

ps, The winner of my recent Izabel London giveaway is Raffles Bizarre...well done and thank you to all who entered my giveaway!

View Post
Blogger Templates By pipdig